When you embark on the journey of managing a Virtual Private Server (VPS), it’s essential to grasp the fundamental concepts that underpin this technology. A VPS is essentially a virtualized server that mimics a dedicated server within a larger physical server. This means you have your own dedicated resources, such as CPU, RAM, and storage, which are isolated from other users on the same physical machine.

Understanding this separation is crucial because it allows you to configure and manage your server environment according to your specific needs without interference from others. As you dive deeper into VPS management, you will encounter various tools and platforms designed to simplify the process. One such platform is WHMCS, a popular web hosting automation tool that streamlines the management of your VPS. This is what you have access to in our client area.
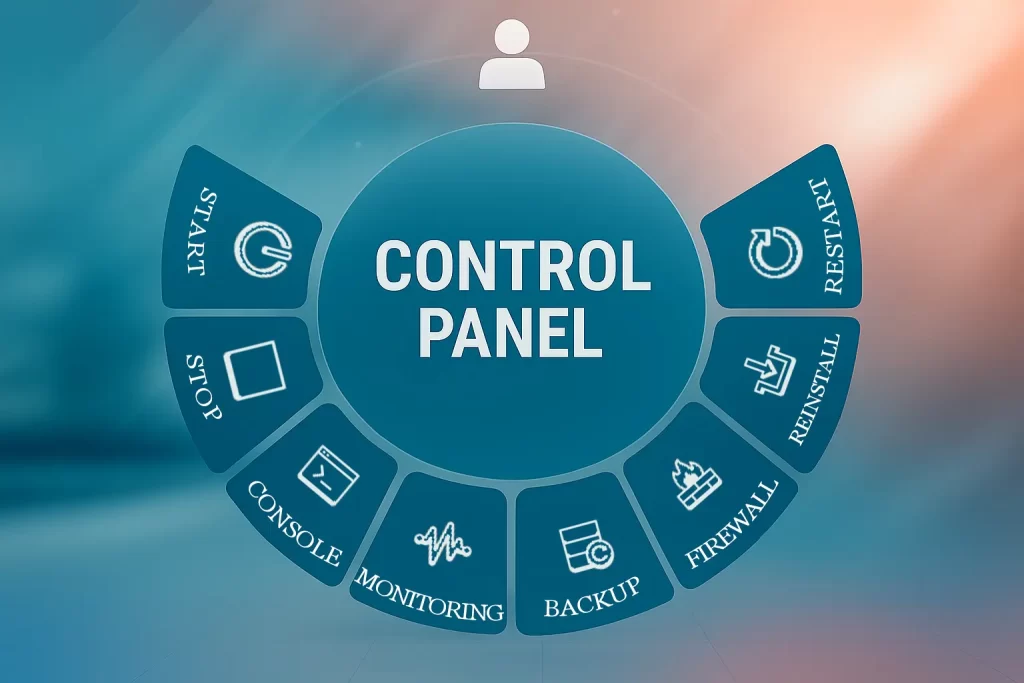
With our tool, you can perform a multitude of tasks, from restarting your server to backing it up, all from a user-friendly interface. Familiarizing yourself with these functionalities will empower you to maintain optimal performance and security for your VPS, ensuring that it runs smoothly and efficiently.
Managing Your VPS With Serverly Hosting Client Area
Managing your VPS from Serverly is quick, intuitive, and gives you complete control over your server environment. Below are some of the ways our client area makes it easy to handle your VPS management tasks efficiently – all from a single, centralized client area. To get started, simply log in to your client area. If you’re having any difficulty, our guide is here to help you with step-by-step instructions on how to login.
 Starting Your VPS Using The Client Area.
If your VPS has been powered down for any reason – be it maintenance or an unexpected shutdown – starting it up again is a straightforward process through our client area. The platform provides an intuitive interface where you can easily locate the option to start your server. This feature is particularly useful for users who may not have direct access to their virtual server or those who prefer managing their VPS remotely.
When you initiate the start command from our client area control panel, the system sends a signal to the server to power it on. Depending on the server’s configuration and current state, this process may take a few moments. Once your VPS is up and running, it’s advisable to check its status and ensure that all services are operational.
If you encounter any issues during startup, you can always contact the support to help you out with the process.
 Restarting Your VPS Using TheClient Area.
Restarting your VPS is a fundamental task that can resolve many common issues, such as unresponsive applications or system slowdowns. When you choose to restart your VPS through our client area control panel, you are essentially giving your server a fresh start. This process can be initiated easily from our client area dashboard, where you can find the option to reboot your server with just a few clicks.
It’s important to note that while restarting is generally safe, it’s wise to ensure that any critical processes are saved or stopped beforehand to prevent data loss. Once you initiate the restart, our panel communicates with the server to execute the command. You may notice a brief downtime during this process, but it typically lasts only a few moments.
After the restart is complete, you should monitor your server’s performance to ensure that everything is functioning as expected. If issues persist even after a restart, it may indicate deeper underlying problems that require further investigation.
 Stopping Your VPS Using TheClient Area.
There are times when you may need to stop your VPS temporarily – perhaps for maintenance or resource management purposes. Stopping your VPS through our client area control panel is a simple yet effective way to manage your server resources efficiently. By accessing the control panel, you can find the option to shut down your server safely without risking data corruption or loss.
When you choose to stop your VPS, our control panel ensures that all running processes are terminated gracefully. This means that any applications or services will be given the opportunity to save their state before shutting down completely. After stopping your VPS, it’s essential to monitor its status and ensure that it remains in a powered-off state until you are ready to start it again.
This control over your server’s operational state allows for better resource allocation and management.
For more detailed instructions on how to start/stop (restart) your VPS using our client area control panel, you can refer to our Knowledgebase Article.
Backing Up Your VPS
Backing up your VPS is one of the most critical aspects of server management. Data loss can occur due to various reasons, including hardware failure, accidental deletion, or even cyberattacks. By utilizing our control panel for backups, you can automate this process and ensure that your data is consistently protected.
The platform allows you to schedule regular backups, which can be invaluable in maintaining the integrity of your data over time. To back up your VPS through our control panel, navigate to the Additional Tools section of the interface, and you can find backup options. Here, you can select the frequency of backups – whether daily, weekly, or monthly – based on your needs.
Additionally, our control panel provides options for storing backups in different formats, allowing you to choose between different backup types for compatibility. Once set up, you can rest easy knowing that your data is safeguarded against unforeseen circumstances.
Reinstalling the Operating System
Reinstalling the operating system on your VPS can be necessary for various reasons – perhaps you’re experiencing persistent issues or want to start fresh with a clean slate. Our control panel simplifies this process significantly by providing an option to reinstall the OS directly from its interface. This feature allows you to select from various operating systems and versions available for installation.
Before proceeding with an OS reinstallation, it’s crucial to back up any important data stored on your VPS. Reinstalling the operating system will typically erase all existing data on the server, so taking this precaution will help prevent any unintended loss of information. Once you’ve secured your data, you can initiate the reinstallation process through our client area by selecting your desired OS and confirming the action.
The system will then handle the installation automatically, allowing you to focus on configuring your new environment once it’s complete.
For step-by-step guidance, check out our guide for LXC Reinstallation and KVM Reinstallallation.
Monitoring VPS Resources
Effective resource monitoring is vital for maintaining optimal performance on your VPS. Through our client area, you have access to various tools that allow you to monitor resources like Graphs, Network, Resource Notifications, etc.. This includes monitoring CPU usage, RAM allocation, and disk space – all of which play a crucial role in how well your server operates under different workloads.
With Serverly Hosting, you can view real-time statistics regarding resource usage, enabling you to identify any bottlenecks or areas where adjustments may be necessary. For instance, if you notice that your CPU usage is consistently high during peak times, it may be time to consider upgrading your plan or optimizing your applications for better performance.
Troubleshooting VPS Issues
Despite best efforts in management and maintenance, issues may still arise with your VPS from time to time. Fortunately, Thai Hosting offers several troubleshooting tools designed to help you diagnose and resolve common problems efficiently. Whether you’re dealing with connectivity issues, application errors, or performance slowdowns, having access to these resources can save you valuable time and frustration.
When troubleshooting through our client area, start by checking the task history available within the platform. These logs provide insights into recent activities and errors that may have occurred on your VPS. Additionally, Serverly offers Console tools so you can access your server directly if remote connection is not possible, helping pinpoint specific issues quickly.
If problems persist after attempting these solutions, consider reaching out to the support for further assistance. In conclusion, managing a VPS through our client area equips you with powerful tools and functionalities that streamline various tasks, from restarting and backing up your server to troubleshooting issues effectively. By understanding these processes and utilizing them efficiently, you can ensure that your VPS remains secure and performs optimally over time.
Embracing these management techniques will not only enhance your technical skills but also contribute significantly to the overall success of your online endeavors.
Other features included in your Client Area
- VM Power Tasks allow you to effortlessly control your virtual machine’s operations, such as powering on, rebooting, or shutting down your server automatically with just a few clicks.
- Create/Manage Firewall Rules to secure your server by defining specific traffic permissions, blocking unauthorized access, and ensuring a robust layer of protection for your data.